How to Make Authentic Kimchi: A Step-by-Step Guide for 2024

Are you ready to embark on a flavorful journey into the heart of Korean cuisine? Get ready to transform your kitchen into a Korean fermentation station! In this comprehensive guide, we'll walk you through the process of making authentic, mouth-watering kimchi that'll have your taste buds doing a happy dance. Whether you're a culinary novice or a seasoned chef, this step-by-step tutorial will help you master the art of kimchi-making. Let's dive in and unlock the secrets of this Korean superfood!
What is Kimchi and Why Should You Make It?
Before we roll up our sleeves and get our hands dirty (quite literally!), let's take a moment to appreciate the rich history and cultural significance of kimchi. This fermented vegetable dish has been a staple in Korean cuisine for over 2,000 years. In fact, kimchi is so important to Korean culture that it has its own museum in Seoul!
But what exactly is kimchi? At its core, kimchi is a traditional Korean side dish made from fermented vegetables, typically napa cabbage, combined with a variety of seasonings. The magic happens during the fermentation process, which not only preserves the vegetables but also creates that distinctive tangy, spicy, and umami-rich flavor that kimchi is famous for.
Now, you might be wondering, "Why should I bother making kimchi at home when I can just buy it from the store?" Great question! Here are a few compelling reasons:
- Health Benefits: Kimchi is a nutritional powerhouse. It's low in calories but high in fiber, vitamins A and C, and beneficial probiotics. These good bacteria support gut health, boost your immune system, and may even help with weight management.
- Customization: When you make kimchi at home, you're in control. You can adjust the spiciness, saltiness, and even the vegetables used to suit your taste preferences. Want a milder kimchi? No problem! Craving an extra kick? Go for it!
- Cost-Effective: While store-bought kimchi can be convenient, making your own is often more economical, especially if you consume it regularly. Plus, you can make larger batches and enjoy it for weeks or even months.
- Cultural Connection: Making kimchi is a great way to connect with Korean culture. It's not just about the end product; it's about embracing the process and understanding the tradition behind this beloved dish.
- Versatility: Homemade kimchi isn't just a side dish. It can be used in countless recipes, from kimchi fried rice to kimchi quesadillas. Having a jar of homemade kimchi in your fridge opens up a world of culinary possibilities.

Essential Ingredients for Authentic Kimchi
Now that we've covered the 'why', let's move on to the 'what'. To make authentic kimchi, you'll need a specific set of ingredients. Don't worry if some of these seem unfamiliar – we'll explain each one and suggest alternatives where possible.
- Napa Cabbage: This is the foundation of traditional kimchi. Napa cabbage, also known as Chinese cabbage, has a mild flavor and crisp texture that's perfect for fermenting. If you can't find Napa cabbage, you can use regular green cabbage as a substitute, though the texture will be slightly different.
- Korean Red Pepper Flakes (Gochugaru): This is the key to that signature kimchi flavor and vibrant red color. Gochugaru is made from sun-dried red chili peppers and has a complex flavor that's spicy, sweet, and slightly smoky. It's different from regular chili flakes, so try to find the real deal for authentic flavor. If you absolutely can't find gochugaru, you can use a mix of regular chili flakes and paprika, but the flavor won't be quite the same.
- Garlic, Ginger, and Green Onions: This aromatic trio forms the flavor base of kimchi. Fresh is best here – the pungent bite of raw garlic, the warmth of ginger, and the mild onion flavor of green onions all contribute to kimchi's complex taste profile.
- Jeotgal (Salted Seafood): This is the secret umami booster in traditional kimchi. Jeotgal is typically made from salted shrimp or anchovy sauce. It adds depth and complexity to the flavor. If you're vegetarian or can't find jeotgal, you can omit it or use a bit of miso paste for a similar umami kick.
- Fish Sauce and Korean Soup Soy Sauce: These liquid seasonings enhance the overall flavor of kimchi. Fish sauce adds saltiness and umami, while Korean soup soy sauce (gukganjang) provides a more nuanced salty flavor than regular soy sauce. If you're making a vegan version, you can use more soy sauce or a vegan fish sauce alternative.
- Other Vegetables: While Napa cabbage is the star, other vegetables play supporting roles. Korean radish (mu) adds crunch and a hint of sweetness. Carrots provide color and additional texture. You can also add other vegetables like green cabbage or even fruits like pear for added dimension.
- Sugar: A small amount of sugar helps kickstart the fermentation process and balances out the salty and spicy flavors. You can use regular white sugar or natural alternatives like pear or apple puree.
Remember, the beauty of making kimchi at home is that you can adjust these ingredients to suit your taste. Don't be afraid to experiment!
Tools and Equipment You'll Need
Before we start chopping and mixing, let's make sure you have all the necessary tools and equipment. Don't worry – you won't need any fancy gadgets. Here's what you'll need:
- Large Mixing Bowl: You'll need a bowl big enough to hold all your cabbage and brine. A stainless steel or glass bowl works best.
- Colander: This is for draining your salted cabbage.
- Clean Glass Jars or Korean Earthenware Containers (Onggi): These will be used for fermenting and storing your kimchi. If you're serious about kimchi-making, consider investing in a traditional Korean onggi. These earthenware pots are specially designed for fermenting kimchi and other foods.
- Cutting Board and Knife: You'll be doing a fair bit of chopping, so make sure your knife is sharp.
- Gloves: Trust me, you'll want these! Kimchi-making can get messy, and the chili can stain your hands. Plus, using gloves is more hygienic when you're handling food that will ferment.
- Large Spoon or Spatula: For mixing your kimchi paste and vegetables.
- Measuring Cups and Spoons: For accuracy in your ingredients.
- Grater: Optional, but useful for ingredients like ginger and garlic.
Now that we have our ingredients and tools ready, let's move on to the exciting part – making kimchi!
Step-by-Step Guide: How to Make Kimchi
Step 1: Preparing the Cabbage
- Start with 1 large Napa cabbage (about 2 pounds).
- Cut the cabbage lengthwise into quarters, removing the core.
- Cut each quarter into bite-sized pieces, about 2 inches wide.
- Place the cabbage in your large bowl and sprinkle with 1/4 cup of sea salt.
- Gently massage the salt into the cabbage leaves.
- Cover the bowl with water and let it sit for 1-2 hours, turning the cabbage every 30 minutes to ensure even salting.
- After salting, rinse the cabbage thoroughly under cold water to remove excess salt.
- Drain well in a colander, squeezing out any excess water.
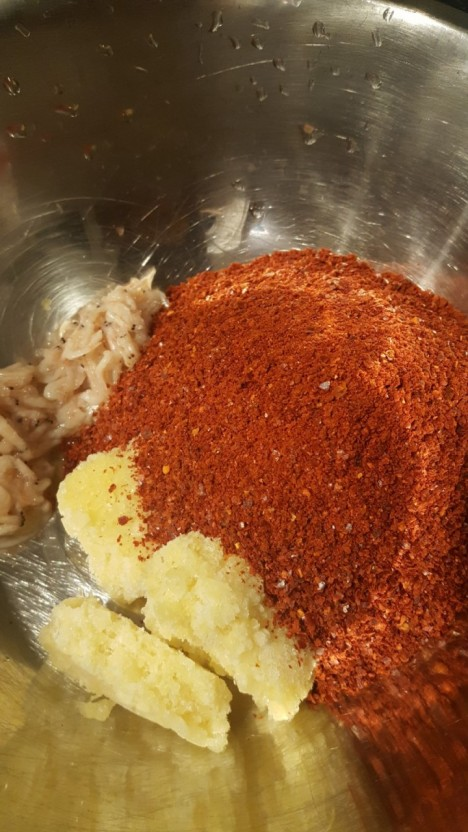
Step 2: Making the Kimchi Paste
While your cabbage is salting, it's time to prepare the kimchi paste. This is where the magic happens!
- In a bowl, mix together:
- 1/2 cup Korean red pepper flakes (gochugaru)
- 1/4 cup fish sauce
- 1/4 cup minced garlic (about 5-6 cloves)
- 1 tablespoon grated ginger
- 2 tablespoons Korean soup soy sauce
- 2 teaspoons sugar (or sweet pear puree)
- 1/4 cup water
- Chop 1 cup of green onions into 1-inch pieces and add to the paste.
- If using, add 2 tablespoons of salted shrimp (jeotgal).
- Mix everything together until you have a uniform paste.
Step 3: Combining Cabbage and Paste
Now comes the fun part – mixing everything together!
- Put on your gloves (seriously, don't skip this step).
- In a large bowl, combine your drained cabbage with the kimchi paste.
- Using your hands, gently massage the paste into the cabbage, making sure every leaf is coated.
- If you're using other vegetables like radish or carrots, add them now and mix well.
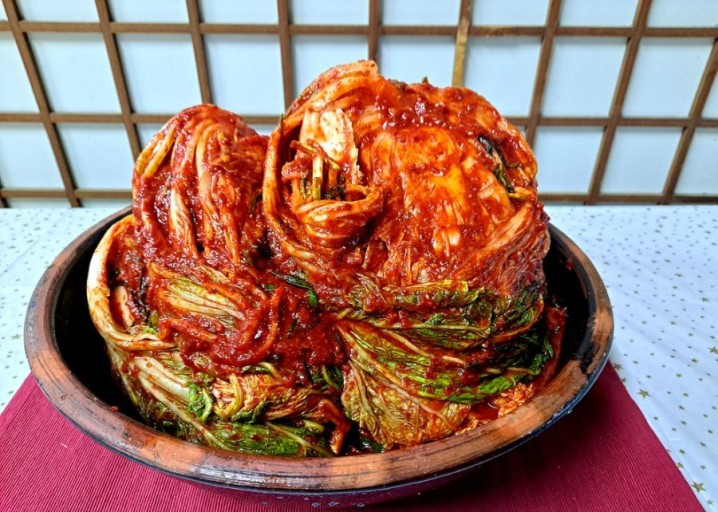
Step 4: Packing and Fermenting
- Pack the kimchi into your clean jars or containers, pressing down firmly to remove any air pockets.
- Leave about 1 inch of space at the top of each container, as the kimchi will expand as it ferments.
- Seal the containers loosely – you want to allow some gas to escape during fermentation.
- Place the containers in a cool, dark place (like a pantry) for 1-5 days, depending on your preference and the ambient temperature.
- During fermentation, you may see bubbles forming and liquid rising to the top – this is normal and good!
- Taste your kimchi daily until it reaches your desired level of fermentation. When it tastes good to you, transfer it to the refrigerator to slow down fermentation.
Congratulations! You've just made your very own batch of authentic kimchi. But our journey doesn't end here – let's dive deeper into the fascinating world of kimchi fermentation.
The Fermentation Process: Patience is Key
Fermentation is where the real magic of kimchi-making happens. During this process, beneficial bacteria (primarily lactic acid bacteria) break down the sugars in the vegetables, creating that characteristic tangy flavor and preserving the kimchi.
The fermentation process can take anywhere from a few days to several weeks, depending on various factors:
- Temperature: Warmer temperatures speed up fermentation, while cooler temperatures slow it down. The ideal temperature range for kimchi fermentation is between 60°F to 70°F (15°C to 21°C).
- Salt Content: Salt helps control the fermentation process. Too little salt can lead to rapid fermentation and potential spoilage, while too much can slow down fermentation.
- Sugar Content: The natural sugars in the vegetables (and any added sugar) provide food for the bacteria. More sugar can lead to faster fermentation.
- Personal Preference: Some people prefer their kimchi fresh and crisp, while others love the deep, complex flavors of well-aged kimchi.
During the initial fermentation period (1-5 days at room temperature), you'll notice some changes in your kimchi:
- Bubbles will form as the bacteria produce carbon dioxide.
- The kimchi will become more sour and develop a more complex flavor.
- The vegetables will soften slightly but should still retain some crunch.
Once your kimchi has reached a flavor you enjoy, transfer it to the refrigerator. Cold temperatures slow down fermentation, but don't stop it completely. This means your kimchi will continue to develop flavor over time, albeit much more slowly.
How to Tell When Your Kimchi is Ready
Kimchi is a living food, and it's ready when you think it tastes good! Here are some signs to look out for:
- Aroma: Properly fermented kimchi should have a pleasantly sour, slightly pungent smell. If it smells off or unpleasant, something may have gone wrong.
- Taste: The flavor should be tangy, spicy, and complex. It should taste sour, but not overwhelmingly so.
- Texture: The vegetables should be slightly softened but still have a nice crunch. They shouldn't be mushy.
- Appearance: Look for bubbles in the brine – this is a good sign of active fermentation.
Remember, there's no "perfect" time to eat kimchi. Some people love it fresh and crisp, while others prefer it deeply fermented. Try it at different stages to see what you like best!
Storing and Aging Kimchi for Deeper Flavors
Once you're happy with the initial fermentation, it's time to think about storage and aging. Here are some tips:
- Refrigeration: Store your kimchi in the refrigerator to slow down fermentation. Make sure it's in a sealed container to prevent the smell from permeating your fridge (unless you want everything to smell like kimchi!).
- Submerge in Brine: Always make sure your vegetables are submerged in the brine to prevent mold growth.
- Use Clean Utensils: When taking kimchi out of the jar, always use clean utensils to prevent introducing harmful bacteria.
- Watch for Signs of Spoilage: While kimchi can last for months in the refrigerator, always check for signs of spoilage like mold, off-smells, or slimy texture.
- Aging: If you want to develop deeper, more complex flavors, you can age your kimchi for several months in the refrigerator. Aged kimchi, known as "mukeunji" in Korean, is prized for its intense flavor and is often used in cooking.

Troubleshooting Common Kimchi-Making Issues
Even with the best intentions, sometimes things don't go exactly as planned. Here are some common issues you might encounter and how to fix them:
Dealing with Overly Salty Kimchi
If your kimchi turns out too salty, don't worry! Here are a few solutions:
- Rinse the kimchi briefly under cold water and drain well.
- Add more unsalted, chopped vegetables to balance out the saltiness.
- Use it in cooking where you can control the overall salt content of the dish.
Preventing Mold Growth
Mold is the enemy of good kimchi. To prevent it:
- Always make sure your vegetables are submerged in the brine.
- Use clean utensils when handling your kimchi.
- Don't let air pockets form when packing your kimchi into jars.
If you do spot mold, it's best to discard that portion of the kimchi to be safe.
Adjusting for Too Much or Too Little Fermentation
- If your kimchi is fermenting too quickly, move it to a cooler location or refrigerate it.
- If it's fermenting too slowly, try moving it to a slightly warmer spot.
- Remember, you can always let fresh kimchi ferment more, but you can't un-ferment kimchi that's too sour for your taste.
Fixing a Kimchi that's Too Spicy or Not Spicy Enough
- If your kimchi is too spicy, add some additional vegetables or a bit of sugar to balance it out.
- If it's not spicy enough, you can add more gochugaru or even some fresh chili peppers to kick up the heat.
Remember, making kimchi is part science, part art. Don't be afraid to experiment and adjust things to suit your taste!
Creative Ways to Use Your Homemade Kimchi
Congratulations! You've now got a batch of delicious, homemade kimchi. But don't limit yourself to just eating it as a side dish. Kimchi is incredibly versatile and can be used in a wide variety of dishes. Here are some ideas to get you started:
Traditional Korean Dishes Featuring Kimchi
- Kimchi Jjigae (Kimchi Stew): This hearty stew combines kimchi with pork belly, tofu, and sometimes tuna for a warming, satisfying meal.
- Kimchi Fried Rice: Stir-fry day-old rice with kimchi, spam or bacon, and top with a fried egg for a quick and delicious meal.
- Kimchi Pancake (Kimchijeon): Mix chopped kimchi into a savory pancake batter and fry until crispy. It's perfect as a snack or light meal.
- Kimchi Dumplings (Kimchi Mandu): Use kimchi as a flavorful filling for homemade dumplings. The tangy, spicy kimchi pairs beautifully with pork or tofu.
- Kimchi Soup (Kimchi Guk): A light, refreshing soup made with kimchi, pork, and tofu. It's especially popular as a hangover cure in Korea!
Fusion Recipes: Taking Kimchi Global
Kimchi's unique flavor profile makes it a fantastic ingredient for fusion cuisine. Here are some creative ways to incorporate kimchi into non-Korean dishes:
- Kimchi Quesadillas: Add chopped kimchi to your quesadillas for a Korean-Mexican fusion that's out of this world.
- Kimchi Grilled Cheese: Elevate your grilled cheese sandwich by adding a layer of kimchi. The tangy, spicy flavor cuts through the richness of the cheese beautifully.
- Kimchi Pasta: Sauté kimchi with bacon and toss with pasta for a quick, flavorful meal. Top with a sprinkle of seaweed for an extra umami boost.
- Kimchi Tacos: Use kimchi as a topping for tacos instead of (or in addition to) traditional slaw for a Korean twist on this Mexican favorite.
- Kimchi Burger: Top your burger with kimchi for a crunchy, spicy kick that complements the meat perfectly.
Using Kimchi as a Condiment or Side Dish
Of course, kimchi shines on its own as well. Here are some simple ways to enjoy your homemade kimchi:
- As a Side Dish (Banchan): In Korean cuisine, kimchi is often served as one of many side dishes accompanying a meal.
- Kimchi with Grilled Meats: The acidity and spice of kimchi cut through the richness of grilled meats beautifully.
- Kimchi in Wraps and Sandwiches: Add a spoonful of kimchi to your next wrap or sandwich for an extra flavor punch.
- Kimchi with Eggs: Try serving kimchi alongside scrambled eggs or omelettes for a spicy breakfast kick.
- Kimchi as a Topping: Use kimchi as a topping for pizza, baked potatoes, or even hot dogs for a unique twist.
The Cultural Significance of Kimchi
As we wrap up our kimchi-making journey, it's worth taking a moment to appreciate the cultural significance of this beloved dish. Kimchi is more than just a food in Korea – it's a cultural icon that has been recognized by UNESCO as an Intangible Cultural Heritage of Humanity.
A Brief History of Kimchi
The origins of kimchi can be traced back over 3,000 years. Originally, it was a simple salted vegetable dish developed as a way to preserve food for the long, harsh Korean winters. Over time, with the introduction of chili peppers to Korea in the 16th century, kimchi evolved into the spicy, fermented dish we know today.
Traditionally, kimchi-making was a communal activity. Families and neighbors would gather in late autumn for "kimjang" – a kimchi-making festival where they would prepare large quantities of kimchi to last through the winter. This tradition fostered a sense of community and allowed families to share labor and resources.
Kimchi in Modern Korean Society
Today, while many Koreans buy commercially produced kimchi, the tradition of homemade kimchi remains strong. Many families still practice kimjang, albeit on a smaller scale. Kimchi refrigerators, designed to maintain optimal conditions for kimchi fermentation, are a common appliance in Korean homes.
Kimchi has also become a point of national pride for Korea. There's even a government-run Global Kimchi Institute dedicated to researching and promoting kimchi!

Kimchi Goes Global
In recent years, kimchi has gained popularity worldwide as part of the growing interest in fermented foods and Korean cuisine. It's now common to find kimchi in supermarkets across the globe, and it's frequently featured on menus in non-Korean restaurants.
By making your own kimchi, you're not just creating a delicious condiment – you're participating in a culinary tradition that spans thousands of years and connects you to Korean culture in a tangible way.
Conclusion: Your Kimchi Journey Has Just Begun
Congratulations! You've now mastered the art of making authentic kimchi at home. From understanding the essential ingredients to troubleshooting common issues, you're well-equipped to create delicious batches of this Korean staple.
Remember, kimchi-making is both an art and a science. Don't be afraid to experiment with different vegetables, spice levels, and fermentation times to find your perfect kimchi. Each batch you make will teach you something new and help you refine your technique.
As you enjoy your homemade kimchi, whether on its own or incorporated into various dishes, take a moment to appreciate the rich cultural heritage behind this humble yet complex food. You're not just eating a delicious, healthy condiment – you're participating in a culinary tradition that has brought people together for thousands of years.
So, what are you waiting for? Grab your apron, roll up your sleeves, and get ready to fill your kitchen with the tantalizing aroma of homemade kimchi. Your taste buds (and your gut bacteria) will thank you!
Happy fermenting, and may your kimchi always be crisp, flavorful, and bursting with probiotic goodness!


Comments ()